As a beginner, it is impossible to do everything right. No matter how many videos you watch and tutorials you read, this is a natural part of the process. However, you can avoid some very common mistakes that many beginner embroiderers make. In this article, you’ll see what you should steer away from and what to do instead.
Disclaimer: This article contains affiliate links.
Mistake #1: long threads
In the past years, I could observe a type of behavior that at least one participant in my workshops showed. It was the arm that rose higher and higher to pull the thread. You might have guessed it: the overly long thread!
If you have to raise your arm over your head to pull your stitches tight, the thread is definitely too long. Many beginners cut their threads longer to avoid starting and ending threads too often. It sounds logical, but it has a major problem.
In reality, it is very exhausting to raise your arm like that for a majority of stitches. The danger of knotted threads – something we fear the most as embroiderers. Okay, aside from getting our work stained by the coffee or tea that we aren’t supposed to sip while stitching. A knotted thread takes time to undo and sometimes you have to even cut it and start anew. That is not very time-saving!
Furthermore, embroidery threads are not sturdy wire. Every time you pull the thread through the fabric, abrasion happens and the thread becomes a bit weaker. This is much more obvious when stitching specialty threads like metallic threads, but it is very much a thing with regular 6-stranded embroidery floss, too.
With a very long thread, you might end up with a much darker or muddier shade of your thread than at the beginning. Also, the sheen of the stitches will not be the same.
In Wahrheit ist es aber sehr ermüdend, den Faden immer so lang ziehen zu müssen. Die Gefahr ist groß, dass der Faden dabei auch noch verknotet. Und so endet die Zeitersparnis meist am ersten zu entwirrenden Knoten.
How long should embroidery thread be?
The ideal length is your underarm plus 50%. This way, you can stitch in short movements with enough thread length so that you don’t have to change that often. 12-20 inches / 30-50 cm is a good general length for embroidery thread.
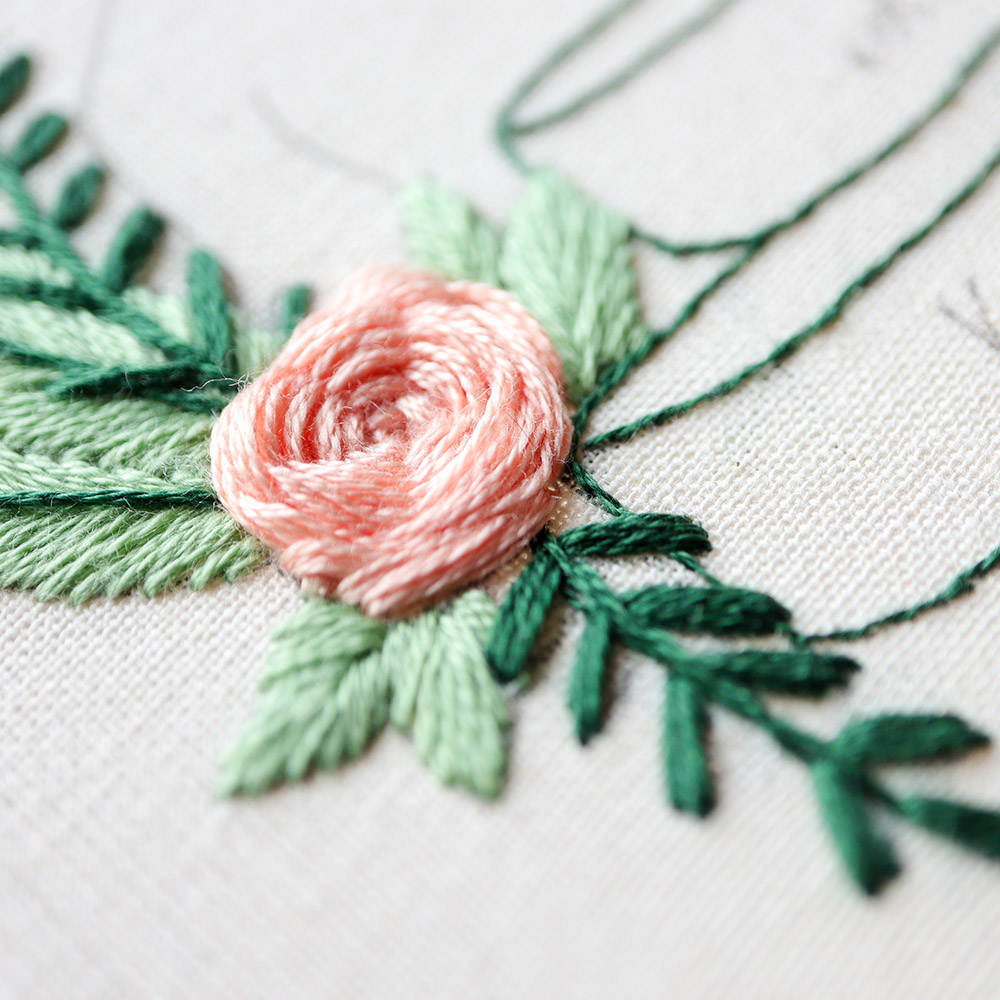
There is one exception: the woven rose. For this and other woven stitches, the thread doesn’t pass through the fabric itself that often and you need a lot of thread to make the stitch. For the woven rose, you can use double the usual length without a problem.
Mistake #2: Starting with a difficult project first
This is a mistake I have made myself lots of times and therefore it is one I see a lot in other people. Usually, we want to tackle a new project by seeing something cool on Pinterest or Instagram. You buy everything you need out of pure excitement and start right away. And then the realization hits after a couple of stitches, that the thread doesn’t behave as it should and the thing in your hands looks nothing like the beautiful inspo picture.
Most of the time the real eyecatchers on Pinterest and Co. are not easy to stitch at all for a complete beginner.
Especially in the beginning, it is a real challenge to get each stitch even and smooth. But adding to the challenges of a beginner, those projects often include difficult fabrics like velvet or tule. that makes it much harder to get the hang of the craft than necessary.
Solution: Make a stitch test
As a beginner, it is difficult to rate which projects are difficult and which are easier to stitch. By the way: more difficult doesn’t equal better, more unique, or prettier, and easier doesn’t equal boring, generic, or ugly.
If you insist on stitching a challenging project as your very first one, there is a solution to this problem: the stitch sample.
It works like a sampler. A simple piece of the fabric you want to use that you can practice the stitches on. You can use a cotton tea towel or a scrap piece of fabric for this step. But if you want to use any other type of fabric than a non-stretchy linen or cotton fabric, you should use that other fabric for your sample.
This helps you understand how the fabric and the stitches behave. For example, not every fabric wants to sit snuggly stretched in an embroidery hoop. This little extra step also helps you see how the stitches work with your chosen materials.
It can be so frustrating to start a project in full force only to be disappointed by the result. So spare yourself the head ace – or heart ace if you ruined your favorite t-shirt – and test things out first.
You can absolutely do the challenging stuff! Just invest a bit of time in preparation first.

Hand Embroidery for Beginners eBook
All the first steps in one place – in the eBook “Hand Embroidery for Beginners” I’ll teach you all the basics step by step.
Mistake #3: Using embroidery fabric
If you look for embroidery fabric specifically, you’ll inevitably run into a type of fabric that is not that suitable for freehand embroidery. The general perception of embroidery fabric is actually a special fabric for counted stitch techniques like cross stitch.
For cross stitch and other counted stitching, it is very important that the threads of the fabric are perfectly even, creating a perfect square for each crossing of thread. Fabrics woven like this ensure that the crosses in cross stitch are always square, too.
There are many different types of counted fabrics like AIDA or evenweave linen. Technically, you could embroider on those fabrics but it is way too expensive to use for freehand embroidery and also not ideal. The coarser types with large holes make it difficult to stitch fine, curved lines because of the noticeable grid.
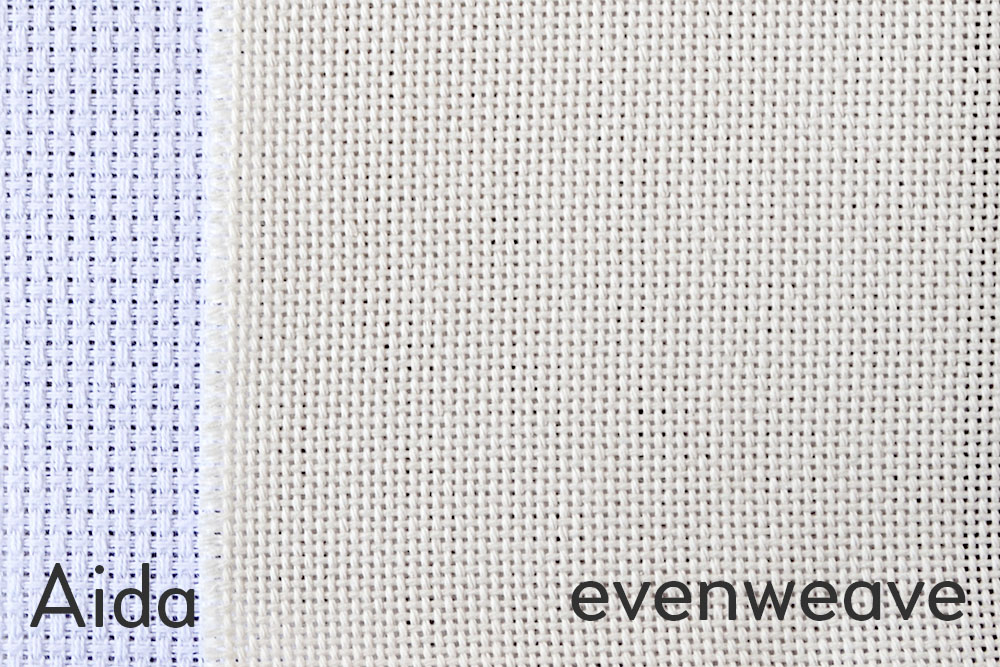
These fabrics are good for embroidery
Use regular cotton or linen fabrics instead! It is important to avoid very elastic fabrics and I also suggest staying away from thin fabrics, too. I love to use calico (British English)/muslin (American English) fabric. Calico is raw, mostly unbleached cotton fabric. It is not stretchy and has a nice grip. It is thick enough to hold the tension of the stitches nicely and thin enough to easily trace patterns through.
>>> Read more about suitable fabrics for hand embroidery here.
There are fabric options that you might even have at home. Cotton tea towels, cotton pillowcases, nonelastic bed sheets – there are many household fabrics that are too good to throw out but not in regular use. If you want to try out the hobby first, this might be a great way to save money and get some use out of the things you already have.
Mistake #4: Impatience
Hand embroidery has its reputation for being a very slow craft. This is not a myth – embroidery does take a while to do! When I stitched on the 50 fully embroidered pages of my recent book, I was shock how much of a difference each embroidery stitch choice made in case of speed. Depending on how many details or areas to cover fully (hello satin stitch my frenemy…) it took 4 hours or 3 days to create one page.
No matter how small your motive, it is most likely NOT finished in 30 minutes. Embrace the fact that it takes a while because you will be slowed down when you try to speed things up!
Why? Because of this:
Relaxed embroidery
Embroidery threads are not here to mess around with. They hate to be pulled quickly. The longer the thread the quicker they will knot. 90% of the involuntary knots are caused by speedy stitching. Slow down a bit and see if it improves.
The other 10% are the twist of the thread and sometimes the bad quality of threads.
Hand embroidery is a beautiful hobby. Don’t rush through the project. Take a seat, surround yourself with things you enjoy, and start stitching. Not to finish stuff but to enjoy the process. It will be finished in the end, don’t stress about it too much.
Well, unless you have to hurry up because you lazy thing started stitching the gifts way too late and need it to be done ASAP. In this case, you can’t afford to pull the threads quickly because the knots will drive you even crazier! You can leave out the fluffy environment in this case though.
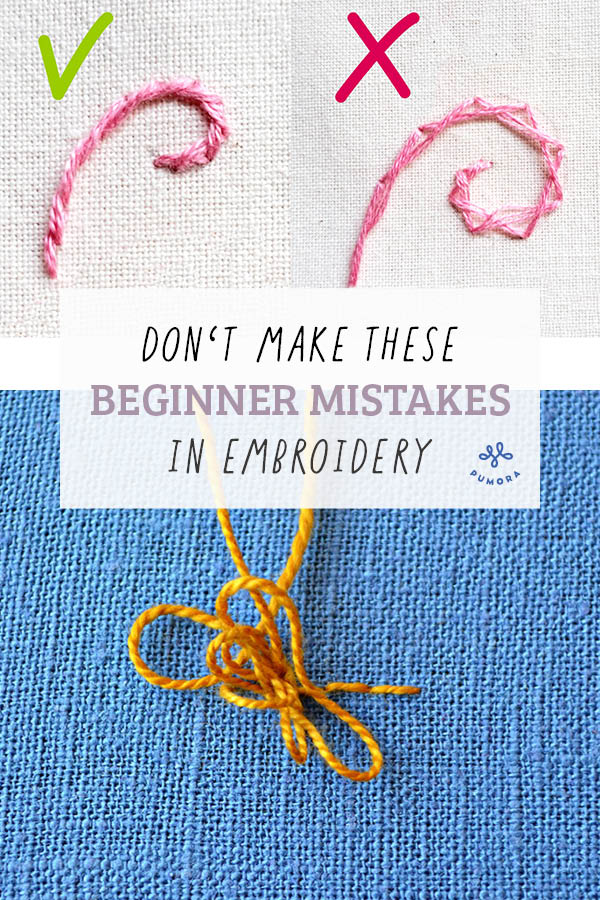
Mistake #5: long stitches
This mistake is related to the previous one. I see many beginners using very long embroidery stitches. When you don’t know how long a stitch should be, it can happen and it also is quicker.
The problem is that especially in curves the long stitches stand out in a negative way. Stitches tend to be straighter the longer they are. If you want to do a rounded shape, this effect compromises the outcome. Stem stitch is a great example, of how the appearance changes with longer stitches. In the picture below, you can see the difference between a longer and shorter stitch.
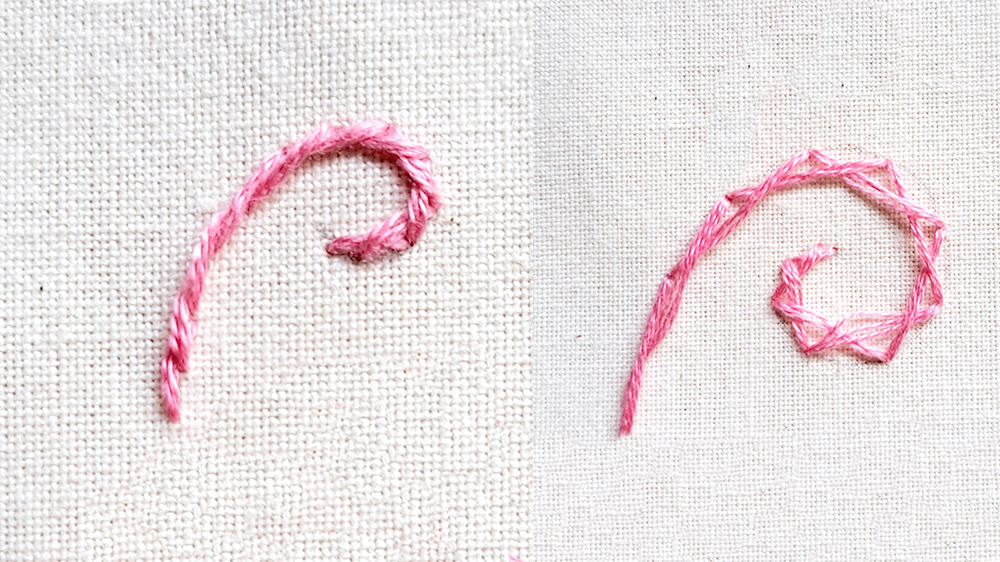
On the left, the stem stitches are much shorter. On the right, the stitches are significantly longer, creating more of a set of triangles than a smooth line. This is a dramatic depiction of this effect but it occurs on a smaller scale, too.
Use shorter stitches
The general rule for 2-3 stranded threads is a length of under 1 cm or 1/3 inch. Even shorter in curves: 2-3 mm or 0.1 inch.
Especially in very tight curves for letter embroidery or small-scale flower stems, it can change your stitching game from meh to wow!
The chain stitch also looks rounder when stitched shorter and more straight and oblong when stitched longer.
However, there is no definite rule for stitch length as it depends on the thickness of your thread, the stitches, and the effect you want to create. Try out different stitch lengths and see for yourself. The difference might surprise you.
Bonus Mistake: Cheap materials
In my experience and the many messages I receive regularly cheap materials often are not worth their money. I have written about this before, still I want to address it here again since it is a big mistake that beginners tend to make.
You don’t need much to start with embroidery. The embroidery hoop and thread are basically the most expensive part of the hobby. You only need one hoop for stitching and new threads for each project.
I really hate cheap embroidery hoops. They don’t hold the tension of the fabric well and good embroidery hoops are not an expensive item to get. I personally stay away from bamboo hoops and from certain types of closures.
>>> Read more about beginner embroidery tools and what to watch out for.
Do you want more tips and tricks on hand embroidery?
Join the Tutorial Alert! It is a biweekly newsletter that contains information about new tutorials & articles on Pumora, tips & tricks, and promotional content like new embroidery patterns or special discount codes.
You’ll receive an email to confirm your subscription to the Newsletter. Please also check your Spam folder and mark the email as no Spam.