Hand stitching a decorative piece of embroidery art is a great accomplishment. After putting in hours, days, or in some cases even years, you might want to have a nice setting for it to be displayed in your home. The type of framing of an embroidery piece is something that can enhance your work or make it look dull, mismatched, or in the worst case – damage your work. I don’t want to scare you but yes, your framing can destroy your embroidery!
Disclaimer: This article contains affiliate links.
Why should you frame your embroidery?
You are probably here because you already want to frame your embroidery and don’t need any pros or cons. Yet, it might be good to know about the functions of a frame. There are multiple jobs that a frame is intended to do:
- Beauty
- Support
- Protection
The emphasis is on beauty most of the time because that is what we see in the pretty pictures. But if you don’t intend to hang your embroidery for a short period of time like a month or so, support and protection are also some valid factors that your frame should be able to accommodate. The way you frame your embroidery should be so that it holds the fabric tight and in place (support) and also protect your work from dust, dirt, and abrasion (protection).
Later when I write about specific framing options, I’ll use these 3 functions to talk about the pros and cons.

Framing embroidery for beauty
The most obvious job is to create a beautiful setting or surrounding for your embroidery. The frame works as a connector between the embroidery art and your walls. Even if your embroidery pieces are completely different to each other, you can create some unity by using the same style of frames for them.
Beauty lies in the eye of the beholder and that is why it is impossible to tell you exactly what you should do for your particular embroidery piece. Since embroidery is a kind of picture, you can apply the same rules as for framing regular art pieces. But even these rules are changing constantly over the centuries and decades so there is no real wrong or right. The most important thing is that YOU like it.
Framing embroidery for support
One of the questions I get regularly is: How do I frame my embroidery without wrinkles and wobbly fabric? Well, this is the part where the support is important. This function is not so much about the materials but about execution. If you just lay your embroidery in the frame it will most likely not be a flat fabric. In most cases, you have to stretch the fabric and before that iron it (sometimes you can’t). How you stretch your fabric depends on the framing method you choose. I will talk about that later when I describe each framing option in depth.
Framing for protection
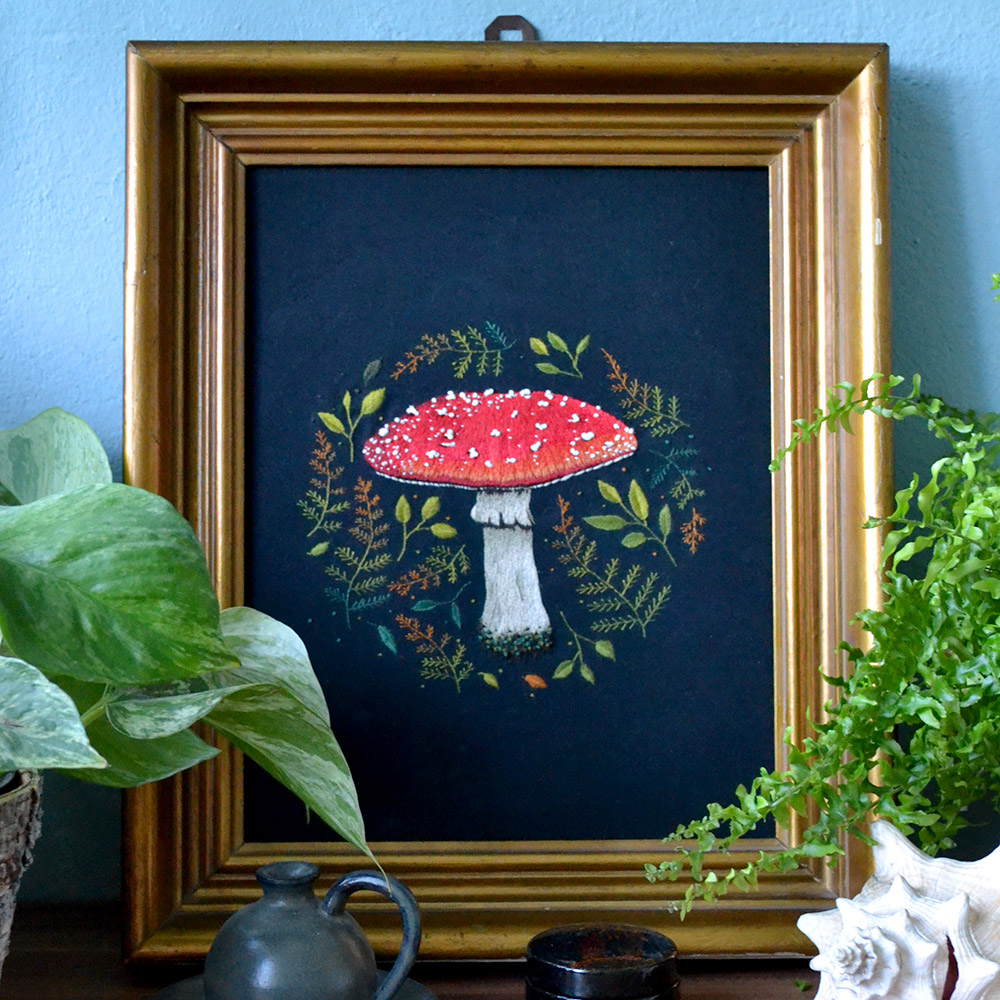
If you want to have your embroidery in the frame for a long time, it is important to protect it from the outside world. Dust is a major factor here and also sunlight, but there is only so much your frame can do about that (there are UV-protective glass frames though). I have an embroidery piece that hangs in the kitchen for over a year now and has no glass protection on it. It is on a piece of black fabric and like a miracle, there is no dust on it whatsoever. How? I framed it in a very deep old frame and the overarching frame keeps the dust off like a canopy! I didn’t really understand the true purpose of these voluminous frames until then. In contrast, an embroidery hoop doesn’t protect your fabric from dust at all. That is why you should dust off your embroidery hoops on the walls from time to time or they will be hard to clean at some point. More about that later!
You see, there is more to a frame than how it looks. So please don’t just select your frame by the style, also take a look at the support and protection it gives to a work that you spent a long time creating. I understand that there are many people who switch out their embroidery art regularly. In this case, it is not as important to have it protected against everything. And maybe, you don’t mind a slightly wobbly fabric at all. There is nothing wrong with that. As I said: it is totally up to you how you frame your embroidery art.

Types of frames for embroidery
Framing directly in a regular embroidery hoop
This method has become a very popular framing option. It is accessible and easy to do. If you don’t glue in the fabric, you can easily take out the embroidery again and again without damaging it. Usually, embroidery hoops are very minimal, so they don’t add a thick layer of something to the embroidered piece. There is an exception: the double hoop, which you can use as a frame for your embroidery. Here is a video on how to frame an embroidery piece in a flexi hoop. The process is very similar to other hoops.
pro
- quick and easy framing process
con
- no protection from dust
- the fabric tension can become loose over time
- limited shapes – mostly circular and oval
Mounting embroidery on canvas
You can mount your embroidered fabric on a canvas or use a frame that a canvas would be stretched on. Usually, you would staple or thumbtack your fabric on the wooden frame in the back like an upholstery. This helps you to stretch the fabric in the front and also creates a neat and secure back. The canvas itself has no border around it so it actually is not a frame on its own. You can add a frame to the canvas if you want or leave it modern and open without one.
An alternative option creating a silimar look are wooden canvas panels.
pro
- easy framing process
- can be used with or without a frame
con
- no protection from dust
- limited to rectangle shapes
Embroidery in a regular picture frame
Yes, you can use a regular picture frame for your embroidery. I must admit though, that I find it much harder to balance it than with other framing options. There are so many options! The 2 main points here being: with or without glass and with or without a mat?
With or without glass?
The glass is very good at keeping dust and dirt off your embroidery. It also is very good at squishing your embroidery stitches flat! So, if you have a very texture heavy embroidery piece, like my hair embroideries or just very thick knots and so on, don’t use a picture frame with glass that has no space between these two layers. A mat can help to create a bit of a distance between fabric and glass. For 3D embroidery, there is a simple solution: deep picture frames aka shadowbox picture frames. I have recently stumbled across one and it is the first time I can frame my hairstyle embroidery pieces behind glass!
With or without a mat?
I personally find that a mat often gives a picture in a frame a certain stylish chic. The thing is, that paper an fabric can collide with each other. A very coarse and textured fabric sometimes looks weird when surrounded by a flat and smooth paper mat. If you feel like the mat is not adding to your embroidery, leave it out! There are incredible artisan frame and mat makers out there who specialize in framing hand embroidery.
pro
- can be protected from sunlight with UV-protective glass
- many options
con
- can be hard to center and position correctly
- takes more time to frame
The vintage/antique picture frame
These extravagant and voluminous picture frames make quite an entrance. It is very easy for these pretties to distract from their content: your embroidery piece. But a vintage or antique picture frame with all the ornamental jazz around it can actually enhance your piece. Remember the embroidery project on black fabric I wrote about earlier? That frame is a vintage frame from my great-grandfather and when I saw it, I immediately knew what project had to go in there. I find these heavy golden frames work great with bold or dark colors. They are also fantastic if your motif is vintage-inspired or black and white or sepia. There is a certain mood surrounding them and your embroidery art should be in line with that or it will stick out weirdly or overlooked completely. If your frame gets more compliments than your embroidery, it is not the right match.
pro
- protects from dust
- many shapes
con
- can overwhelm the embroidery
- can be harder to pair with other pieces
Do you want more tips and tricks on hand embroidery?
Join the Tutorial Alert! It is a biweekly newsletter that contains information about new tutorials & articles on Pumora, tips & tricks, and promotional content like new embroidery patterns or special discount codes.


